This post originally appeared on Design Dazzle as part of their 5th annual Summer Camp Series. Now I'm sharing it here along with our instructional video on how to needle felt an ice cream cone necklace.
Summer always makes me ice cream obsessed. I love to eat it, make it and craft it. If you’ve never heard of “needle felting” this craft is a simple and easy way to learn. It’s perfect for rainy days because it can be set aside if you don’t finish it right away and come back to it later. In the end you will have a soft, squishy, adorable ice cream cone necklace.
Another thing I love about felting is that you don’t need many supplies. Just felting wool, a spongy mat and needle, which can be found online or in most craft stores. They are usually by the yarn and knitting sections. It’s important that you use a felting needle because it has little jagged edges to help pull and snag the wool so you can shape it.
Start with the pink wool to create the ice cream scoop. Roll the wool into a loose ball shape. The wool starts out fluffy but the more you poke it and prick it with the felting needle the firmer it will become. It’s important to keep turning it while you poke so all your sides are as even as possible. It’s even more important to not poke your fingers. The felting needle is very sharp and I did poke myself a few times when I first started felting.
*This is not a good craft for small children. My 11 year old daughter loves it and she’s gotten very good at it. Preteen or teenager is a good age to begin felting.*
Then roll the brown wool into a loose cone shape. Poke and turn the cone shape to make it firm and form it. Do not poke the larger end, just leave it loose so you can attach it to the ice cream scoop. (Sorry for the band aid. Wouldn't you know the time I do a tutorial with a very sharp needle is the time I have a band aid on my finger. I swear I wasn't injured from crafting just burned my finger while baking)
Place the cone on top of the ice cream scoop and poke the needle down through the cone into the scoop. The needle will grab all those loose wool fibers from the cone and pull them down into the scoop binding them together.
What’s great about this craft is that you can easily stop here and have a cute simple ice cream cone shape. If you would like more detail you can continue on to add the diagonal waffle pattern around the cone and the little poofy ruffle at the bottom of the scoop.
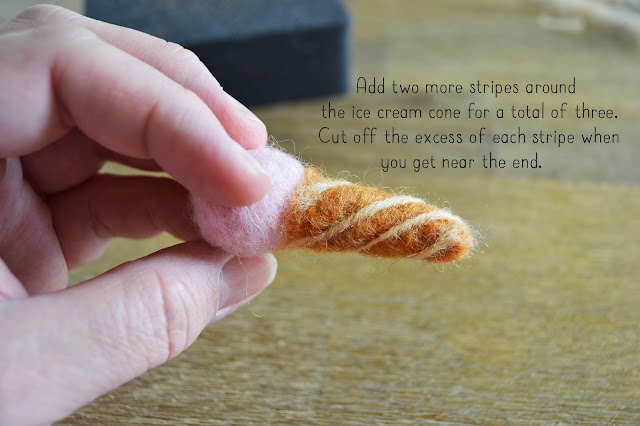
To add the diagonal pattern pull off a small thin section of the light brown wool and twist it in your fingers so it looks like thread.
Then lay it on top of the cone and start poking at the top, working your way down the cone at an angle. This will attach the light brown wool to the cone. Do this three times so you have three diagonal lines around the cone.
The more you prick the wool the more compact it will get. When you want to add details to a section you just prick more where you want the wool indented.
I kept the string very long (about 3 feet) so I could cut it to size after threading it. Since my string wasn’t as thick as I wanted I also doubled it so the end thread was about 1 1/2 feet long.


No comments:
Post a Comment
Of course I would love to hear your comments and thanks for dropping by.